Cisco Identity Services Engine (ISE) is a security policy management and control platform. ISE enables enterprises to provide secure access to network resources, enforcing compliance, enhancing infrastructure security, and streamlining service operations. It is used to create and enforce security and access policies for endpoint devices connected to the company’s routers and switches.
Let’s talk about what it does, its benefits, and how it works in detail:
What Does Cisco ISE Do?
- Secure Access Control: It identifies and allows control over users and devices accessing networks. You can control what they can do based on user identity, location, and the type of device.
- Policy Enforcement: ISE uses context-aware policy enforcement for different network infrastructures (wired, wireless, VPN). This allows it to provide a consistent policy enforcement mechanism.
- Guest Networking: Cisco ISE provides flexible visitor management, allowing guest users to access the network under certain policies.
- BYOD Management: It offers Bring Your Own Device (BYOD) policies that secure and manage employee-owned devices.
- Security Compliance: Cisco ISE can verify that all connected endpoints are adequately secured and compliant with security policies.
Benefits of Cisco ISE
- Visibility: ISE offers clear visibility into users and devices on the network, which helps in understanding the context of user access.
- Security: With ISE, you can enforce compliance and reduce risk through multi-factor authentication, threat-centric Network Admission Control (NAC), and dynamic policy enforcement.
- Consistency: With ISE, security policies can be consistently applied across wired, wireless, and VPN connections.
- Productivity: It supports secure access, guest access, and BYOD provisioning, which can all enhance productivity.
- Scalability: Cisco ISE can be scaled to support a large number of endpoints, making it suitable for enterprise-level organizations.
How Does Cisco ISE Work?
- Authentication: It authenticates users/devices when they try to connect to the network. This could be done using a variety of mechanisms, such as 802.1X (for devices supporting it), MAC Address Bypass (MAB) for those that don’t, or via external identity sources like Active Directory.
- Authorization: Once authenticated, ISE determines what network resources the user/device can access. These authorization policies can be based on a variety of attributes such as user identity, device type, location, and time of day.
- Profiling: Cisco ISE profiles devices connected to the network to gather information, determine the device type, and apply appropriate access policies.
- Posture Assessment: This feature allows ISE to check the security posture of the endpoints before they are allowed to access the network. Devices that do not meet the corporate security policy can be remediated, or access can be limited.
- Reporting & Monitoring: It offers extensive reporting and monitoring features that provide visibility into network security operations.
In a dual data center scenario, ISE can be deployed in a fully distributed model for high availability and scalability. It can handle the load across multiple data centers and provide the necessary redundancy.
In the context of remote sites, ISE can work with Cisco TrustSec technology to simplify the provisioning and management of network access control. Policies can be consistently applied no matter where the user or device connects.
In conclusion, Cisco ISE is a powerful network access control tool that is highly useful in an enterprise environment for managing and securing network access.
More on Profiling
Device profiling is a feature provided by network security solutions like Cisco ISE to identify and categorize devices connected to a network.
Device profiling works by collecting various pieces of information or attributes about a device when it attempts to connect to the network. These attributes may include the MAC address, the device’s IP address, the DHCP class identifier, user-agent strings from HTTP requests, and many others. This information is collected passively as the device communicates on the network, and actively by querying the device or other network resources.
The gathered data points are then compared to a set of known device profiles. Each profile is essentially a list of attributes that are expected to match a particular type of device, such as an iPhone, a Windows laptop, a printer, a security camera, etc.
Once a device is identified and matched to a known profile, the network security solution can then apply appropriate access policies based on the device type. For example, a network printer might be allowed to communicate only with specific print servers, while a user’s laptop might be given broader access to resources.
Device profiling provides several benefits:
- Visibility: It provides detailed visibility into what types of devices are connecting to the network.
- Security: By accurately identifying device types, appropriate security policies can be applied to control access and protect network resources.
- Compliance: In regulated industries, it’s important to know what types of devices are accessing the network. Device profiling can provide this information.
- Network Management: Accurate device profiling can help network administrators manage network resources more effectively, such as planning for capacity and diagnosing network issues.
In summary, device profiling is a critical part of network security and management, providing visibility, control, and compliance by accurately identifying the types of devices that are connecting to the network.
How does ISE Profile
Cisco ISE performs device profiling using a service known as the “Profiler Service“. This service gathers a variety of data and employs several methods to identify and categorize devices connecting to the network. Here’s a high-level overview of how it works:
- Data Collection: The Profiler Service passively collects data about devices as they interact with the network and also actively probes devices to gather more data.
- Passive Profiling: In passive profiling, the ISE Profiler listens to the network traffic and collects data such as MAC addresses, DHCP requests, HTTP user-agent strings, RADIUS attributes, etc., without directly interacting with the endpoint device. It can collect this information from various networking devices like switches, routers, wireless controllers, and firewalls that send these details to ISE.
- Active Profiling: Active profiling involves ISE directly querying the device or other network services for more information. Examples include DHCP span, HTTP probes, NetFlow, RADIUS accounting, SNMP queries, etc.
- Attribute Analysis and Policy Matching: The collected attributes are then compared to a set of known device profiles. Each profile consists of a list of rules based on specific attributes, and if a device matches these rules, it is assigned to that profile.
- Device Categorization and Policy Enforcement: Once a device has been profiled and a device type has been assigned, this information is used to enforce access policies for the device. For example, a profiled printer may have different access permissions compared to a profiled workstation.
- Continuous Profiling: The Profiler service continuously monitors the network and updates the profiling database when changes are detected. This ensures that the device profile reflects the most current state of the device.
Some probes used:
- DHCP probes: When a device sends a DHCP request, ISE captures the DHCP packet’s details and uses this information to identify and classify the device.
- HTTP probes: When a device attempts to connect to the network and sends HTTP packets, ISE captures these packets and uses them for device profiling.
- RADIUS probes: When ISE receives a RADIUS Access-Request packet, it collects relevant information about the endpoint from the packet.
- NetFlow probes: ISE collects NetFlow data about the endpoint device from the Network Visibility Module (NVM) of AnyConnect or from network devices.
- SNMP Query probes: ISE can send SNMP queries to retrieve specific information from an endpoint.
- SPAN probes: ISE can obtain data from Switched Port Analyzer (SPAN) sessions.
By using these methods, Cisco ISE provides granular visibility into the devices on the network and allows administrators to define policies that can distinguish between different device types for proper network resource access.
Components
Cisco Identity Services Engine (ISE) deployment typically includes several components, each of which plays a crucial role in its functionality. Here are the key components:
- Policy Administration Node (PAN): The PAN provides the administrative functions of ISE, such as defining policies and managing configurations.
- Monitoring and Troubleshooting Node (MNT): The MNT handles logging, monitoring, and reporting functions. It also collects data from the Policy Services Nodes.
- Policy Services Node (PSN): The PSN provides the runtime services that enforce policy decisions. It handles all non-administrative functions such as device profiling, posture assessment, guest access, and BYOD device onboarding.
For redundancy and failover purposes, it’s recommended to have at least two nodes for each function (PAN, MNT, PSN).
In addition to these, there are also two other roles:
- pxGrid (Platform Exchange Grid) Node: It facilitates the sharing of contextual information from ISE to other systems such as threat defense systems.
- Secondary Administration Node (SAN): It provides secondary administrative capabilities, should the PAN become unavailable.
The size of the ISE deployment (number of nodes, resources per node) primarily depends on the number of concurrent endpoints, the services needed, and the network’s geographical distribution. For determining the size needed, you can use Cisco’s ISE sizing guide which provides information about the capacity of different ISE appliances and VMs based on various factors like number of endpoints, profiling and posture services, etc.
Keep in mind, the actual network bandwidth used by ISE isn’t usually the primary factor in determining the size of the deployment. The main factors are typically the number of endpoints and the specific services that you need (e.g., profiling, posture, etc.).
However, it’s crucial to ensure that there is sufficient network bandwidth to handle the communication between ISE nodes and between ISE and the network access devices (switches, wireless controllers, firewalls, etc.), especially when these components are geographically distributed.
Lastly, remember to always refer to the most current Cisco ISE documentation and guides for specific recommendations based on the most recent software and hardware options available.
Authentication Types Typically Used:
Cisco Identity Services Engine (ISE) is a network administration product that enables the creation and enforcement of security and access policies for endpoint devices connected to the company’s routers and switches. It allows enterprises to provide secure access to network resources.
The types of authentication typically used in Cisco ISE include:
- 802.1X Authentication: This is the most commonly used authentication type. It is a standard for port-based network access control and provides an authentication mechanism to devices wishing to attach to a LAN or WLAN.
- MAC Authentication Bypass (MAB): This type of authentication is typically used for devices that do not have the capability to perform 802.1X authentication, such as printers and IP phones. With MAB, the device’s MAC address is used as its identity. Even though you’re using MAB, you can still authenticate using AD with these devices if they support it.
- Web Authentication (WebAuth): WebAuth is a fallback authentication method that can be used when 802.1X and MAB are not suitable. It provides a web-based interface to authenticate the users.
- Certificate-Based Authentication: This method uses digital certificates to authenticate the devices. Cisco ISE uses EAP-TLS (Extensible Authentication Protocol-Transport Layer Security) as the protocol for certificate-based authentications.
- TACACS+ and RADIUS Authentication: Cisco ISE also supports Terminal Access Controller Access-Control System Plus (TACACS+) and Remote Authentication Dial-In User Service (RADIUS) for AAA (Authentication, Authorization, and Accounting) services. These protocols are used for remote access authentication and other network security features.
- Guest Services: Cisco ISE provides a guest service that allows temporary access to visitors. Visitors can be given limited network access after going through a web-based authentication.
- BYOD: Cisco ISE allows Bring Your Own Device (BYOD) policies where users can use their personal devices in the corporate network. These devices usually go through a certificate-based authentication.
Remember, the choice of authentication method usually depends on the specific use-case scenario, the types of devices connecting to the network, and the level of security needed.
OUI
Cisco Identity Services Engine (ISE) utilizes an Organizationally Unique Identifier (OUI) database as part of its device profiling service.
The OUI is a 24-bit number that uniquely identifies a vendor or manufacturer. It’s typically part of the MAC address of a networked device. For example, in the MAC address “00-00-0A-00-00-00“, “00-00-0A” is the OUI that identifies the vendor (in this case, it’s Cisco Systems).
Cisco ISE uses the OUI database as a way to help identify the manufacturer of a networked device. When a device connects to the network, ISE probes it and captures the MAC address among other details. ISE then uses the OUI portion of the MAC address to help classify the device by looking it up in the OUI database.
This feature is especially useful in scenarios such as BYOD (Bring Your Own Device) or guest access, where diverse types of devices from various manufacturers connect to the network. By accurately identifying the device manufacturer, ISE can enforce more granular access control policies based on the device type or category.
However, keep in mind that MAC addresses can be spoofed, and the use of the OUI database is only one method that ISE employs to profile devices. It uses a combination of methods (like DHCP probes, HTTP probes, RADIUS probes, etc.) to gather as much information as possible to accurately profile a device.
The OUI database contains the MAC OUIs assigned to vendors. The OUI list is available here:
https://standards.ieee.org/develop/regauth/oui/oui.txt
Deployment Phases:
Now lets talk about what happens when a device plugs into the network. These are generally configured on the Access port as you can see below. We have three modes but I usually see just two in working environments. The three are Monitor, Low-Impact, and Closed. I usually see Monitor and Closed mode. Some will call Monitor, Open.
Open Mode – Monitor Mode – ISE OFF
Cisco Identity Services Engine (ISE) open mode is a feature that allows a network administrator to allow a device to gain network access even if the device is not authenticated. The device is still challenged for authentication and the result can be used for audit or further policy application.
Here is an example of a Cisco switch port configuration using MAC Authentication Bypass (MAB) for open mode:
First, define your RADIUS server:
radius server ISE
address ipv4 10.0.0.1 auth-port 1812 acct-port 1813
key 0 MY_SHARED_SECRET
In this configuration, `10.0.0.1` should be replaced with the actual IP address of your Cisco ISE server, and `MY_SHARED_SECRET` should be replaced with the shared secret configured on the ISE server.
Then, configure your switch port:
interface GigabitEthernet1/0/1
description MAB Enabled Port for ISE Open Mode
switchport mode access
switchport access vlan 10
authentication event fail action next-method
authentication event server dead action authorize vlan 20
authentication event server alive action reinitialize
authentication host-mode multi-auth
authentication order mab dot1x
authentication priority mab dot1x
authentication open
authentication periodic
authentication timer reauthenticate server
mab
dot1x pae authenticator
dot1x timeout tx-period 10
dot1x max-reauth-req 1
In this configuration, `GigabitEthernet1/0/1` is the interface we are configuring. This port is set to authenticate using both 802.1X and MAB, with MAB being the preferred method. The `authentication open` command enables the port to allow traffic before authentication.
Closed Mode – 802.1x – ISE ON
In a Cisco switch port configuration for ISE in closed mode, a device is prevented from passing any traffic until it is authenticated except for the traffic permitted by the pre-authentication ACL.
Here’s an example of such a configuration using 802.1X authentication:
First, define your RADIUS server:
radius server ISE
address ipv4 10.0.0.1 auth-port 1812 acct-port 1813
key 0 MY_SHARED_SECRET
Here, the IP address `10.0.0.1` should be replaced with the actual IP address of your Cisco ISE server, and `MY_SHARED_SECRET` should be replaced with the shared secret configured on the ISE server.
Next, define your pre-authentication ACL:
ip access-list extended PRE-AUTH-ACL
permit udp any any eq domain
permit udp any any eq bootps
deny ip any any
This ACL allows DNS and DHCP traffic but blocks all other traffic.
Finally, configure your switch port:
interface GigabitEthernet1/0/1
description 802.1X Enabled Port for ISE Closed Mode
switchport mode access
switchport access vlan 10
authentication event fail action next-method
authentication event server dead action authorize vlan 20
authentication event server alive action reinitialize
authentication host-mode multi-auth
authentication order dot1x mab
authentication priority dot1x mab
authentication port-control auto
authentication periodic
authentication timer reauthenticate server
dot1x pae authenticator
dot1x timeout tx-period 10
dot1x max-reauth-req 1
ip access-group PRE-AUTH-ACL in
This configuration applies the `PRE-AUTH-ACL` to the port `GigabitEthernet1/0/1`, which is configured to authenticate using 802.1X and MAC Authentication Bypass (MAB) with 802.1X being the preferred method.
Closed Mode – MAB – ISE ON
Cisco Identity Services Engine (ISE) closed mode is a feature that allows a network administrator to prevent a device from gaining network access until it has been authenticated.
Here is an example of a Cisco switch port configuration using MAC Authentication Bypass (MAB) for closed mode with a pre-authentication ACL:
First, define your RADIUS server:
radius server ISE
address ipv4 10.0.0.1 auth-port 1812 acct-port 1813
key 0 MY_SHARED_SECRET
In this configuration, `10.0.0.1` should be replaced with the actual IP address of your Cisco ISE server, and `MY_SHARED_SECRET` should be replaced with the shared secret configured on the ISE server.
Next, define your pre-authentication ACL:
ip access-list extended PRE-AUTH-ACL
permit udp any any eq domain
permit udp any any eq bootps
deny ip any any
This ACL allows DNS and DHCP traffic but denies all other IP traffic.
Finally, configure your switch port:
interface GigabitEthernet1/0/1
description MAB Enabled Port for ISE Closed Mode
switchport mode access
switchport access vlan 10
authentication event fail action next-method
authentication event server dead action authorize vlan 20
authentication event server alive action reinitialize
authentication host-mode multi-auth
authentication order mab dot1x
authentication priority mab dot1x
authentication port-control auto
authentication periodic
authentication timer reauthenticate server
mab
dot1x pae authenticator
dot1x timeout tx-period 10
dot1x max-reauth-req 1
ip access-group PRE-AUTH-ACL in
In this configuration, `GigabitEthernet1/0/1` is the interface we are configuring. This port is set to authenticate using both 802.1X and MAB, with MAB being the preferred method. The `authentication port-control auto` command enables 802.1X authentication and MAB on the port.
From the options above you can see when you are about to implement ISE, you want to run it in Monitor mode first to gain visibility to what’s on the network and see what devices will fail authentication. You can adjust/add policies to work properly first before going to Closed mode.
Troubleshooting
There are several commands that you can use to troubleshoot Cisco Identity Services Engine (ISE) related issues on a network device such as a Cisco switch. Here are some of the most commonly used commands:
1. Show Authentication Sessions: This command shows the current 802.1X/MAB sessions on a specific interface or all interfaces.
Example:
show authentication sessions interface GigabitEthernet1/0/1
show authentication sessions interface gigabitEthernet x/x/x details
CORDERO-SW1#show authentication sessions interface gigabitEthernet 2/0/31 details
            Interface:  GigabitEthernet2/0/31
          MAC Address:  bcad.28c7.4266
         IPv6 Address:  Unknown
         IPv4 Address:  10.1.2.22
            User-Name:  BC-AD-28-C7-42-78
               Status:  Authorized
               Domain:  DATA
       Oper host mode:  multi-auth
     Oper control dir:  both
      Session timeout:  N/A
      Restart timeout:  N/A
       Session Uptime:  297s
    Common Session ID:  0A5240660000040AFFA3DF2B
      Acct Session ID:  0x0000040A
               Handle:  0x520003DD
       Current Policy:  POLICY_Gi2/0/31

Local Policies:
        Service Template: MONITOR_LINKSEC_POLICY_SHOULD_SECURE (priority 150)

Server Policies:
           Vlan Group:  Vlan: 100
              ACS ACL:  xACSACLx-IP-PERMIT_ALL_TRAFFIC-544f05ed

Method status list:
       Method           State

       dot1x            Stopped
       mab              Authc Success
2. Show Access-List: This command displays the configuration of the access control lists (ACLs) that you have defined on your device.
Example:
show access-lists
3. Show Radius Server Group: This command displays the configuration of the RADIUS server groups.
Example:
show radius server group all
4. Debug Dot1x/MAB Events: This command enables debugging of 802.1X or MAB events. Please note that enabling debugging can generate a high volume of logs, which may impact performance. Use with caution and typically under the guidance of a Cisco support representative.
Example:
debug dot1x all
debug mab all
5. Show Dot1x/MAB Statistics: This command displays statistical information about 802.1X or MAB operations.
Example:
show dot1x statistics
show mab statistics
6. Show Interface Status: This command displays the status of all interfaces or a specific interface, which can be useful for verifying basic network connectivity.
Example:
show interface status
show interface GigabitEthernet1/0/1 status
7. Test AAA Command: This command is used to test the authentication process from the switch to the ISE server.
Example:
test aaa group radius USERNAME PASSWORD new-code
In this command, replace `USERNAME` and `PASSWORD` with the credentials you want to test.
Please note that the actual output and usefulness of these commands will depend on the specific configuration of your network and the nature of the issue you are troubleshooting. Always consult the appropriate Cisco documentation or a network professional when troubleshooting network issues.
Wired vs Wireless
From the perspective of Cisco Identity Services Engine (ISE), there are both similarities and differences in handling wired and wireless network access.
Similarities
In both wired and wireless cases, ISE can provide services like authentication, authorization, and accounting (AAA). ISE uses the RADIUS protocol to communicate with both wired switches and wireless LAN controllers (WLCs) for these services. The enforcement of policies based on conditions such as the identity of the user, the device, the location, etc., can be applied similarly to both types of access.
Differences
However, there are differences in the way ISE interacts with the network infrastructure based on whether it’s a wired or wireless connection:
1. Network Device Interaction: For wired networks, ISE directly interacts with the switches that the end devices are connected to. In contrast, for wireless networks, ISE interacts with the wireless LAN controller (WLC) instead of the individual access points.
2. Session Establishment: For wired networks, a session is typically established for each physical port on the switch. For wireless networks, a session is established for each client that associates with an access point.
3. Configuration: While the basic principles are the same, the actual configuration of the network devices for ISE integration can vary between wired switches and wireless LAN controllers.
4. Profiling: The manner in which devices are profiled can differ between wired and wireless networks due to differences in the data ISE receives.
5. Location Services: In wireless networks, Cisco ISE can integrate with the Cisco Mobility Services Engine (MSE) to provide location-based services which is not applicable for wired networks.
In short, while the underlying principles of operation are the same, the actual implementation can vary depending on whether the network is wired or wireless.
Port Security:
The use of port security in conjunction with Cisco Identity Services Engine (ISE) can be a complex decision and is largely dependent on the specific requirements of your network.
Port security is a feature that you can enable on Cisco switches to restrict input to an interface. It provides a basic level of security for your network by preventing unknown devices from using the switch ports.
When port security is enabled, the switch keeps track of all MAC addresses connected to each of its ports and prevents any additional MAC addresses from being connected.
Cisco ISE, on the other hand, provides a much more comprehensive approach to network access control. It can authenticate users and devices across wired, wireless, and VPN connections, enforce policies based on a wide variety of conditions, and provide detailed visibility and control over network access.
In terms of using both features together, it’s important to understand that while they both contribute to network security, they do so in different ways and at different layers.
Using port security and ISE together can provide an additional layer of protection, especially in environments where a single port might be used by multiple devices over time. However, it can also add complexity to the network configuration and management, and it may not always be necessary if ISE is properly configured and used to its full potential.
Furthermore, there can be conflicts between the two. For example, if port security shuts down a port due to a violation, this might interfere with ISE’s ability to handle and audit the situation.
Ultimately, the decision to use port security in conjunction with ISE should be made based on a careful assessment of your network’s specific security needs, the capabilities and limitations of your network infrastructure, and the trade-offs between added security and increased complexity. It’s always recommended to seek advice from network professionals or consultants who are familiar with both technologies.
Certificate Based Authentication:
Since CBA is used a lot, I’ll go over some basic troubleshooting for these.
Check GPOs:
The first thing you should do is first check to make sure the appropriate Group Policy is applied.
1. Open and run the command prompt
2. Type “gpresult /r” :with admin rights, you can do a “gpresult /r /scope “computer””
3. Scroll and look for the “COMPUTER SETTINGS“, “Applied Group Policy Objects”
4. Look to make sure the policy is applied, for the example below, we are looking for two policies: “Workstation Certificate” and “ISE Wired and Wireless Network Settings”
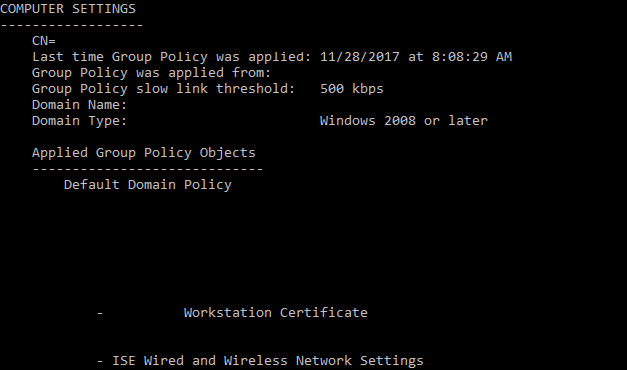
5. If you are missing any Policy, either do a “gpupdate /force” or reboot.
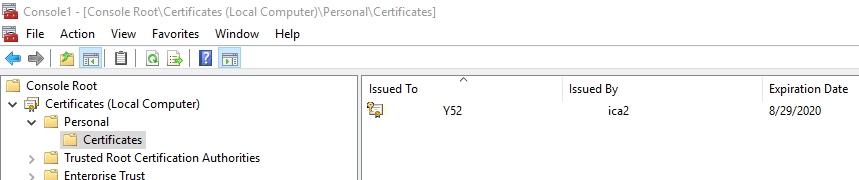
Check Machine Cert:
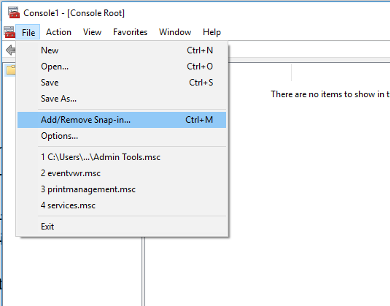
1. Launch MMC by going to: Start, run, and type in “mmc.exe”
2. When the Console window opens up, go to File, “Add/Remove Snap-in…”
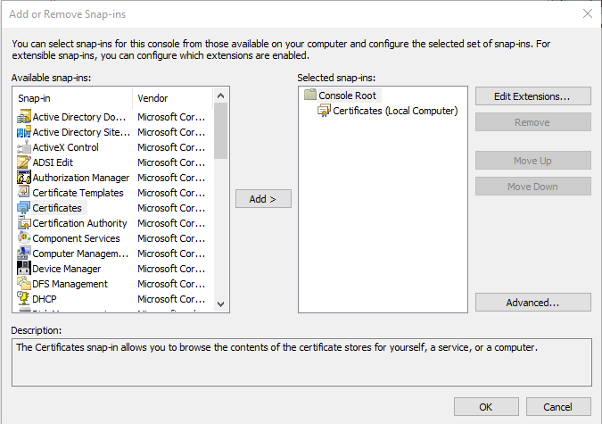
3. Choose “Certificates” and click “Add” to add it to the “Selected snap-ins:” section. Make sure you choose “Local Computer” and click “Finish“. Now you can click “OK” to close out.
4. You should see a screen like the one below. Click on “Personal“, “Certificates“. In the pane to the right, you should see the corporate PC/Device certificate .
5. If you have a valid certificate and you still have problems connecting to the network, you can delete and re-download the certificate. To do this you will have to either open the port or bring the PC/Device to an open port.
6. After deleting the certificate, in the command prompt, run “gpupdate /force” and then reboot the PC/Device. Log back in and check to see if the cert is there. If it’s there, move onto 7.
7. Take the PC/Device back to the original port and try again.
Common Issue:
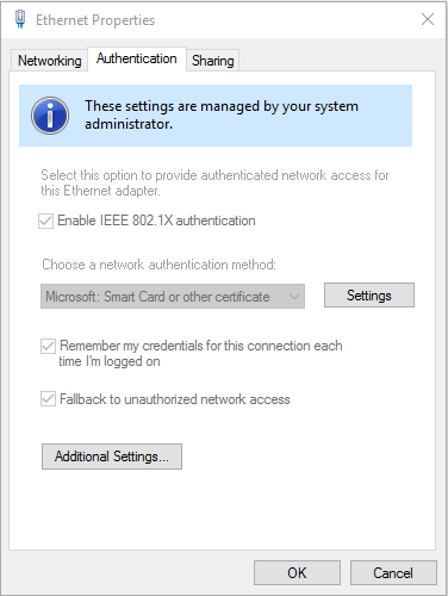
AutoConfig Settings:
There may be a case where Wired and Wireless Autoconfig services are not started and running when they should be. If you are having network connectivity issues and everything looks OK, check these settings. Below I’m assuming you’re using both Wired and Wireless. Check the service you are using.
1. Go to services (services.msc) and find “Wired AutoConfig” and “WLAN AutoConfig“. Make sure that these two services are started and make sure they are set to start automatically.

2. Now check the settings for the NIC. You should see a tab labeled “Authentication” in between the “Networking” and “Sharing” tabs. ISE needs this to properly identify and authenticate the device. If you started the service and still don’t see the “Authentication” tab, you might have to reboot the PC/Device. If, after the reboot, the “Authentication” tab is still not there and the services are set correctly and running, you might have to delete your NIC and reboot your machine.